How to Fix and Prevent Chill Haze

No one likes hazy beer. Other than styles like hefeweizens and wits that are supposed to be turbid, haze is a put-off to most people. Most haze in beer has no taste or flavor, but let’s face it, we drink with our eyes first. There’s nothing more inviting than a sparkling clear beer just begging to be drank. Unfortunately, without filtration, bright beer can be difficult to achieve for many home brewers, but I’m here to help.
One of the more common reasons for hazy beer is chill haze. You know your beer has a chill haze if it’s bright (clear) at room temperature, but turbid (hazy) at fridge temps. Unfortunately, most brewers try to fix chill haze after the beer has been brewed, rather than try to prevent chill haze from the start. Here is a list of best practices that will help ensure your beer is sparkling clear. These are listed in chronological order.
Pre-Fermentation:
– Hot Break – This one is kind of a no-brainer, but a strong boil creates a good hot break. As wort comes to a boil, proteins begin to coagulate and form larger particles. As those particles become larger and clump together, they fall out of solution. I say this is a no-brainer because most brewers already achieve a good rolling boil.
– Finings – Irish moss or whirlfloc are worth their weight in gold; use one or the other on every batch. Either of these will help precipitate hot break and cold break from the wort. Whirlfloc tablets are actually sized for 10 gallon batches, so use a 1/2 tablet for 5 gallons.
– Cold Break – After the boil, chill your wort as fast as possible. As you rapidly chill wort, more protiens, and haze-inducing particulate will precipitate out of solution. This is one of the more critical steps to eliminating chill haze. If you aren’t chilling your wort under 80*F in under 15 minutes, invest some time in improving your process.
Post-Fermentation:
– Cold Crash – Once the beer has completely fermented out, and you’ve given the yeast some time to clean up after themselves, crash the beer down as close to 32F as possible. I know not everyone has refrigeration space that can accomidate a fermenter, but if you, don’t skip this step. Rapidly chilling the beer from fermentation temps to 32F will cause most of the yeast to drop out of solution, it will also help cause chill haze. Why would we want to cause chill haze? Funny that you ask…
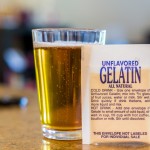
– Gelatin – Now that the beer is ice cold, and probably fairly hazy, you’ll want to fine it with gelatin. Plain old Knox or any other unflavored gelatin will work. Add one teaspoon to about 1/2 cup of water in a microwave safe dish. Pyrex measuring cups work well for this. I also like to use my thermometer probe to stir. Now microwave the solution, stopping to stir and check the temp every 15 seconds. It shouldn’t take much more than 60 seconds to reach 150*F which is our target (Try not to go over 150*). Add the hot gelatin solution to your beer, either straight in the fermenter, or rack your beer on top of the gelatin in a keg. The gelatin will drop out the yeast, and most of the haze inducing particulate in the beer in around 24-48 hours. If you did this in the primary, rack your clear beer into a keg or bottling bucket. If you did this in the keg, simply pull a couple pints of cloudy beer off the bottom of the keg.
– Cold Conditioning – The last, but still important step is to condition your beer cold. Brewers that bottle condition their beer are often eager to try their beer after the several weeks it took to carbonate. As a result, they don’t let the beer condition long at fridge temps. I know I never did. The same problem happens once brewers start kegging their beer. Going from grain to glass quicker is one of the big draws to kegging isn’t it? No matter the package, beer can really benefit from about 2-3 weeks spent at fridge temperatures after fermentation. You can call it conditioning or lagering, but the effect is the same. Haze causing particulate falls out of solution, sharp flavors being to round off, and the beer just plain tastes better.
To summarize: Strong boil, remember the whirlfloc, quick chill. Then cold crash, gelatin, and cold condition. I follow every one of those steps on every batch I brew, and I would urge you to do the same. After all, who doesn’t want crystal clear beer?


Thank you for this information. I live off Baseline and 32nd street and have become obsessed with brewing. I don't always have the patience so these tips are very helpful!
After using the gelatin, do you find it necessary to add more yeast if bottle conditioning? Or is there still enough in suspension even after fining to get proper carbonation?
There is still enough in suspension for carbonation, never had an issue with that.
Scott, great blog! I've found it to be very helpful with hop aromatics and the use of gelatin. Random question though, where did you get your pint glasses? They look JUST like the ones that Sam Adams makes but without the logo, which is awesome!
Hey thanks, but bad news on the glasses. Our local brewery SanTan used to have them made. Sam Adams also thought they looked JUST like their glasses, so they gave SanTan a cease and desist. They don't make them any more.
The new glasses are nice (look like this http://www.santanbrewing.com/hopshock-ipa/). They are just as thick, but not the same shape. I'm praying I don't break any of the 4 old-style ones I have.
Ugh! Yet another reason to dislike Sam Adams. Thanks for the link!
Are you bottle conditioning your beer first before you cold condition them? Or are you just bottling your beer and throwing them into the fridge to condition?
bottle condition first, then toss them in the fridge for a few weeks to cold condition before drinking.
First off, thanks for all your articles, happy I found your site.
I currently can't fit my fermentor in my fridge, so I have to ask, how well does the Gelatin work without a cold crash first?
It works fine, so long as you crash the beer at some point.
Ok, another question, if I do cold crash first, should I leave it in the cold for 24-48 hours after adding the gelatin or move it back to the 68F basement? On my last batch of beer I added the gelatin for a couple of days then moved the carboy to the garage for couple of days where it was in the low 50s and the beer seemed really clear at bottling time, I guess the truth will come next week when I chill it for the first time for a tester, I must say it looks very promising 🙂 Thanks again.
Ya, the only real important time frame is a couple days spent cold after adding the gelatin. Everything stays dropped out after that.
How long do you keep it in the cold crash state 32 deg before bottling? I live north of Chicago so I have the perfect temp outside?
24hours is usually plenty.
Great, finaly I got a grip on this. Thanks, will try this at my next brew.
Hey Scott, great write up. I know this is an old post but I had a question. A lot of your IPA recipes call for a hopstand (or whirlpool hopping). This seems at odds with the "chill as quickly as possible" advice given in this write up. If someone wants a crystal clear IPA would you skip the hopstand in order to quickly chill or do you find the effect of a 20 minute hopstand negligible when it comes to clarity?
Good question, and what you're finding is: stuff I thought mattered 2 years ago, that I'm finding really doesn't matter now.
Recently I've found that a really good hot break, combined with irish moss or whirlfloc later in the boil is much, much more important to clarity than quickly chilling the wort.
How do you find the gelatin process affects the gentle aromas of dry hopping? Lika an IPA i.e.
Great info .. I hear that gelatin take some of the hop flavor And aroma away??
Hi Scott. Any difference in cold crashing the fermenter, adding gelatin, then racking to a keg vs racking to a keg, crashing there, and then adding gelatin before carbing?
Not much to be honest. As long as you add gelatin, and get the beer cold at some point, you'll get the results you're looking for.